Garden Calibration Wizard
Set up your 3D garden model with the calibration wizard so we can accurately calculate sun exposure throughout the year.

Michael Johnson
Founder & Head Gardener
Michael is the founder of Right Plant Right Place and a passionate gardener with several years of experience designing and maintaining gardens.
Expertise
- Garden design
- Plant selection for challenging conditions
- Sustainable gardening practices
- Shade gardening
The calibration wizard guides you through setting up your 3D garden model so we can accurately calculate how sunlight reaches every part of your garden. It takes about 5-10 minutes and involves five main steps.
Don’t worry if this sounds technical—each step is straightforward, and we’ll guide you through it.
Step 1: Verify Orientation
This step ensures your 3D model is correctly oriented. It has three sub-steps: Level, Align, and Crop.
Level
Purpose: Make sure your garden model is the right way up.
The system automatically detects the ground plane and attempts to orient your model correctly. You’ll see a confidence indicator:
- Ground automatically detected (high confidence) — the system is confident the orientation is correct
- Ground detected (please verify) (medium confidence) — check that it looks right
- Uncertain ground detection (low confidence) — you may need to adjust manually
You’ll see a 3D view of your garden model with a white grid representing the ground. The model should appear with the ground at the bottom.
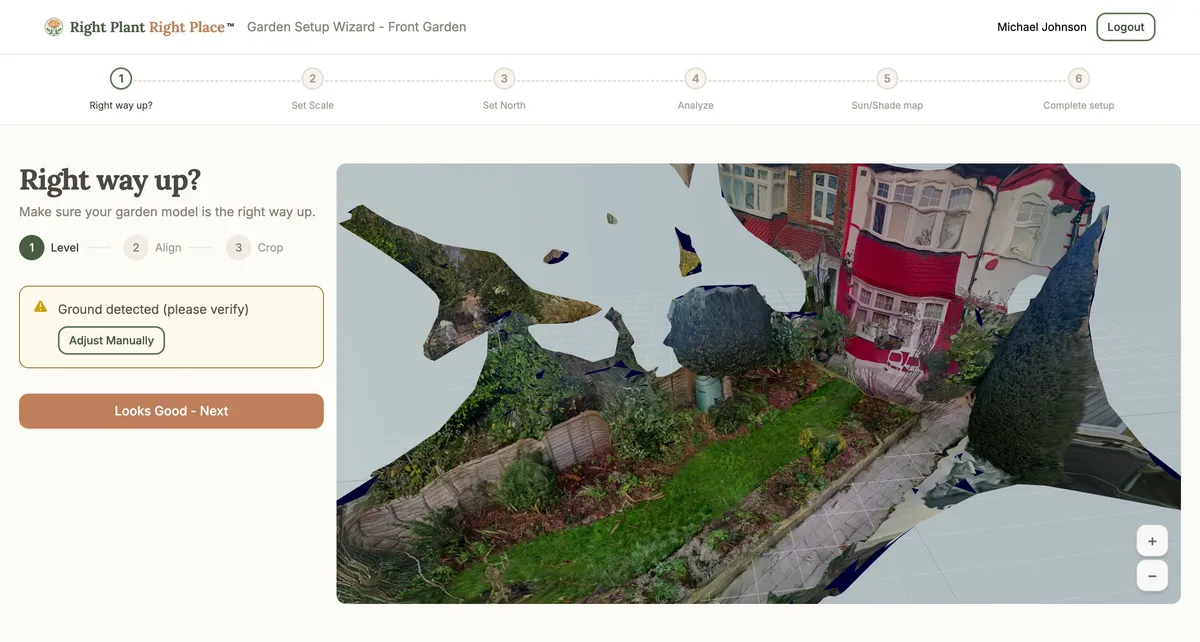
If the orientation is wrong:
- Click “Adjust Manually”
- Use the three sliders to rotate the model:
- Pitch — tilts forward/backward
- Yaw — rotates left/right
- Roll — tilts side to side
- Align the floor of your garden with the white grid
- Click “Next: Align View” when correct
If the orientation looks correct: Click “Looks Good - Next” to continue.
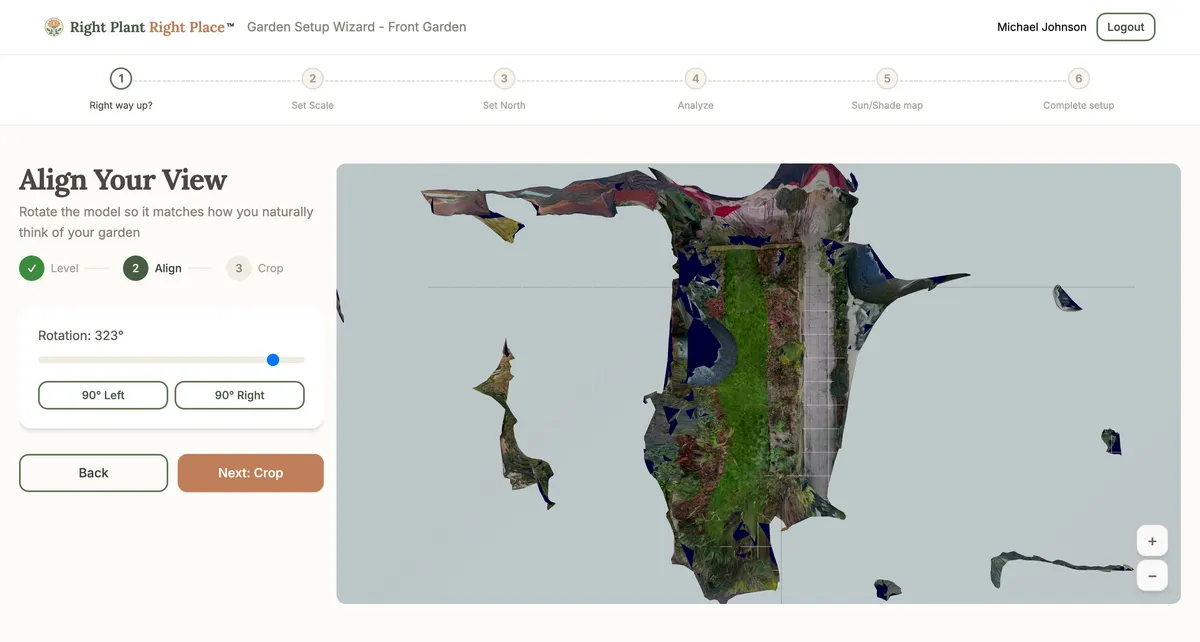
Align
Purpose: Rotate the model so it matches how you naturally think of your garden.
This step shows your garden from above (bird’s eye view). You’ll rotate it so the orientation feels natural to you—for example, so the house is at the bottom and the garden extends upward.
How to align:
- Use the rotation slider (0° to 359°) to rotate the view
- Or use the quick buttons: “90° Left” or “90° Right”
- Rotate until the garden matches your mental picture of it
- Click “Next: Crop” when done
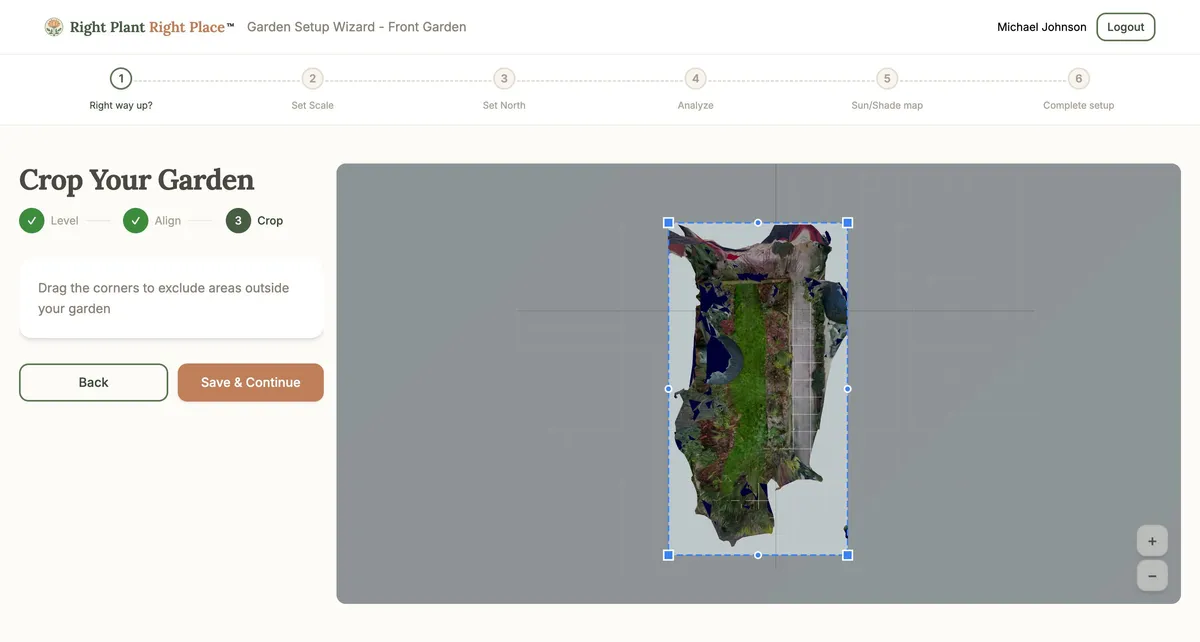
Crop
Purpose: Exclude areas outside your garden from the analysis.
The crop tool lets you focus the sun analysis on just your garden, removing neighbouring properties, roads, or other areas captured in the video.
How to crop:
- You’ll see a rectangular boundary overlaid on your garden view
- Drag the corner handles to resize the boundary
- Position it to include only your garden area
- Click “Save & Continue” to proceed to Step 2
Step 2: Set Scale (Two-Point Measurement)
Purpose: Tell the system the real-world size of your garden.
The 3D model doesn’t know its actual size. By measuring something you know the length of, you calibrate the scale for accurate calculations.
How to set the scale:
-
Click two points on something with a known length:
- The edge of a patio or deck
- A fence panel
- A garden path
- Any feature you can measure in real life
-
Enter the real-world distance between those two points in metres. For example, if you clicked the ends of a 4.5 metre fence, enter “4.5”
Tips:
- Choose points that are clearly visible in the model
- Longer distances give more accurate results
- You can click “Reset Points” to start over
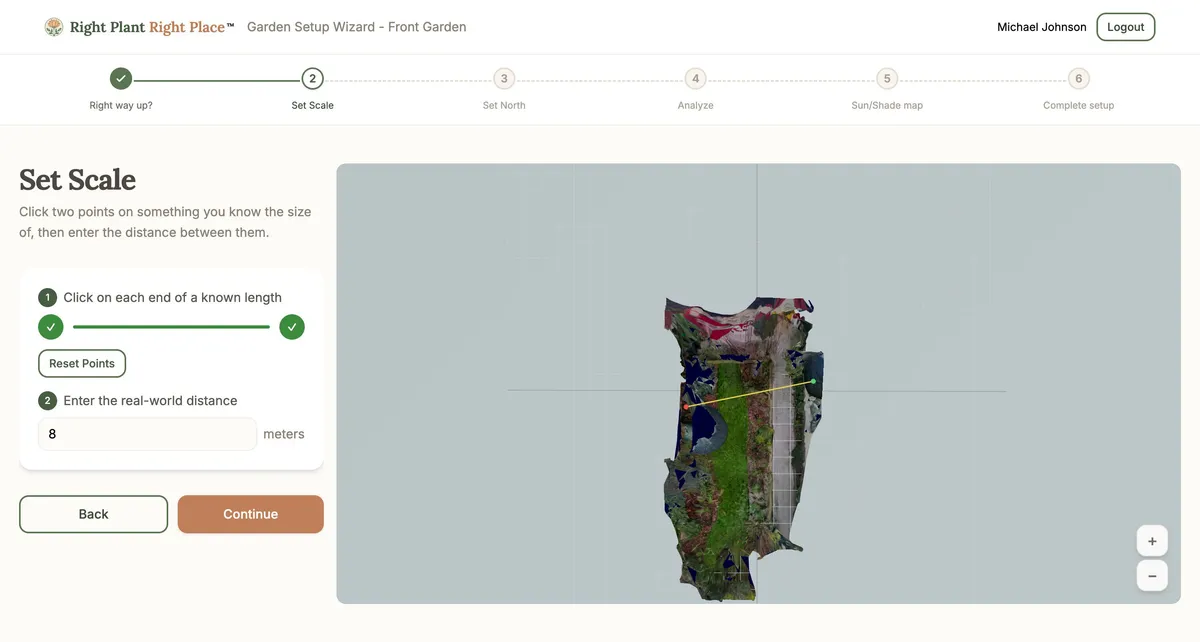
Click “Continue” once you’ve set the measurement.
Step 3: Set North Direction
Purpose: Tell the system which direction is north so sun calculations are accurate.
Setting the compass direction:
- Rotate the compass using the slider (0° to 359°) until it aligns with true north on your garden
- The compass appears on your garden view—rotate it until the “N” points north
Tip: Use a compass app on your phone or check a maps application to find which direction is north relative to your garden.
Setting your location:
Your garden’s geographic location is needed to calculate accurate sun positions throughout the year.
Option 1: Search for your location — type your town or city name in the search box and select from the suggestions.
Option 2: Use current location — click “Use Current Location”, allow location access when prompted, and your location will be detected automatically.
Once your location is set, you’ll see the town/city name displayed. Click “Change” if you need to update it.
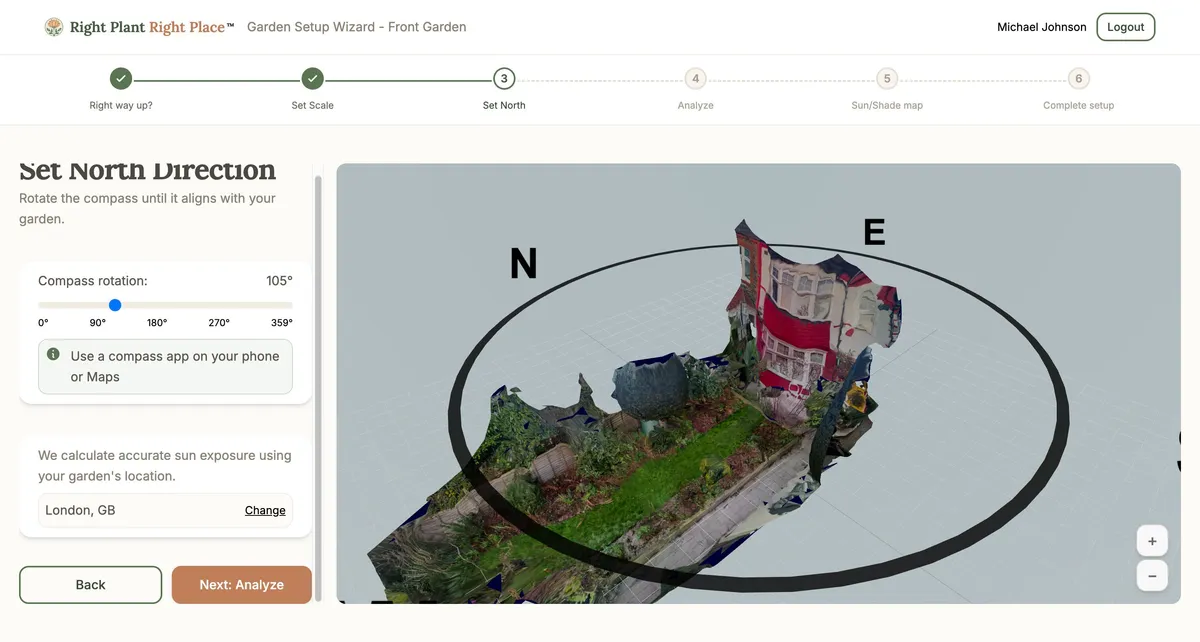
Click “Next: Analyze” to start the sun analysis.
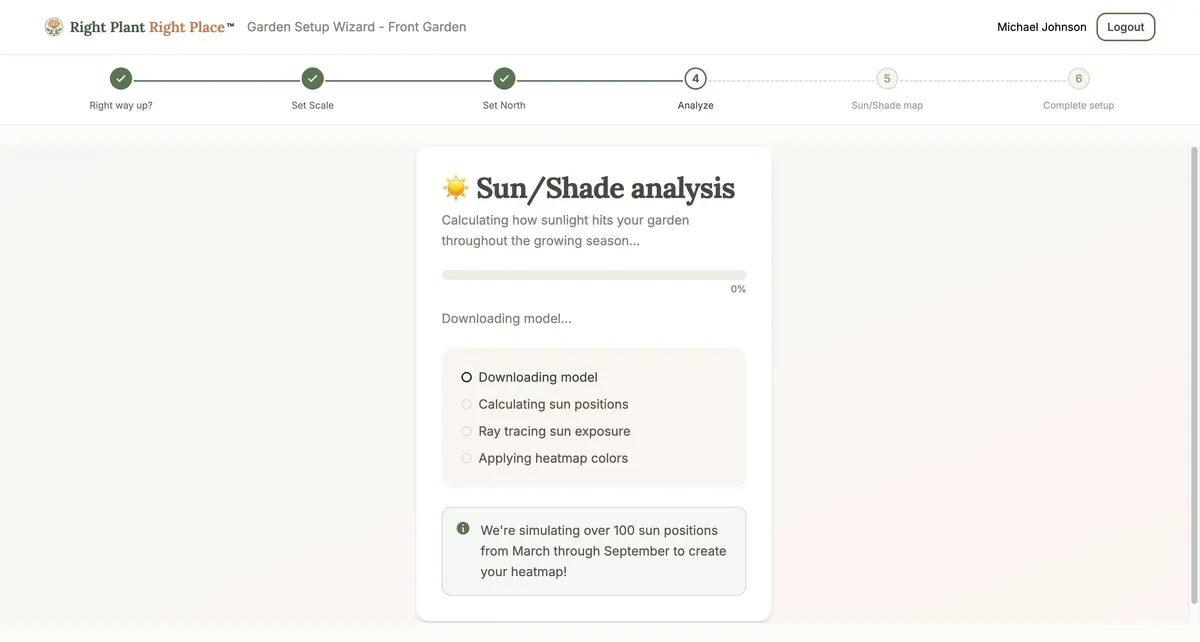
Step 4: Sun Analysis
Purpose: Calculate how sunlight reaches every part of your garden throughout the growing season.
This step runs automatically. The system simulates over 100 sun positions from March through September to create your sun map—a colour-coded view showing how much sun each area receives.
Processing stages:
- Downloading model — retrieving your garden model
- Calculating sun positions — working out where the sun will be at different times
- Calculating sun exposure — simulating sunlight hitting your garden (this takes the longest)
- Applying colours — colouring the model based on sun exposure
What to expect:
- A progress bar shows completion percentage
- A checklist shows which stages are complete
- The process typically takes a few minutes
If analysis fails: An error message will explain what went wrong. Click “Retry Analysis” to try again.
Once complete, you’ll automatically move to view the results.
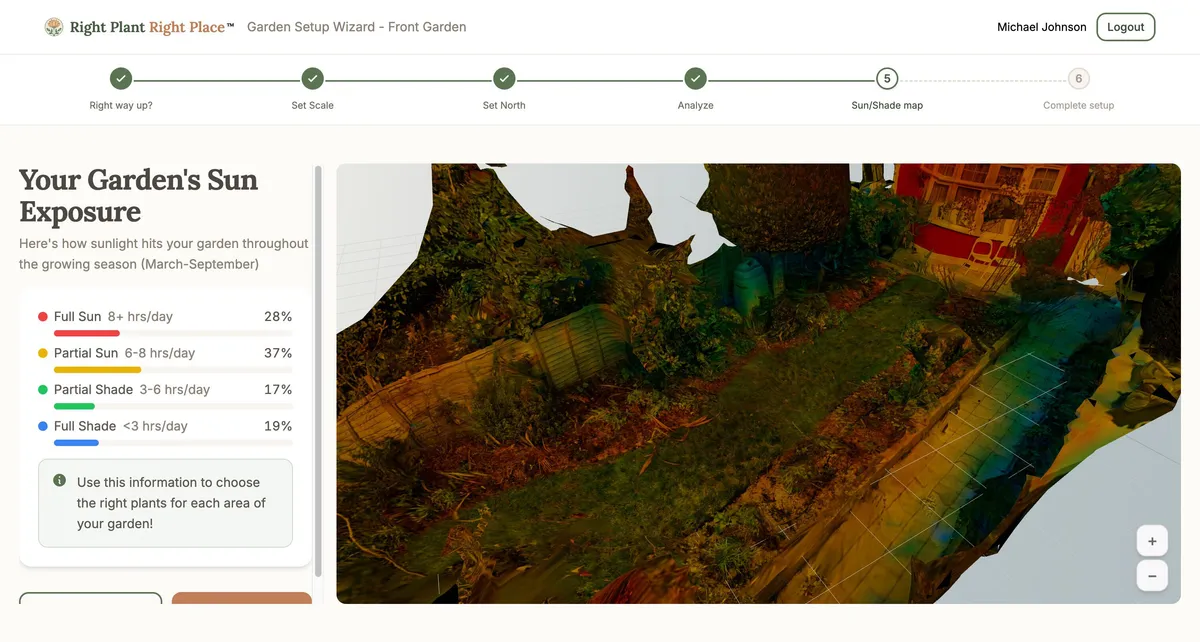
Understanding Your Sun Exposure Results
After analysis completes, you’ll see your garden coloured according to sun exposure levels:
| Zone | Colour | Hours of Direct Sun |
|---|---|---|
| Full Sun | Red | 8+ hours per day |
| Partial Sun | Yellow | 6-8 hours per day |
| Partial Shade | Green | 3-6 hours per day |
| Full Shade | Blue | Less than 3 hours per day |
You’ll see your 3D garden model painted with these colours, along with a breakdown showing the percentage of your garden in each zone (for example: “Full Sun: 35%, Partial Sun: 25%, Partial Shade: 30%, Full Shade: 10%”).
Using this information: This sun map helps you choose the right plants for each area. Sun-loving plants thrive in red/yellow areas, while shade-tolerant plants suit green/blue areas. No more guessing!
Click “Next: Review” to proceed to the final step.
Step 5: Final View
Purpose: Review your completed garden setup and save.
The final step shows a floor plan preview—a bird’s-eye view of your garden with the sun map overlay. This is the view you’ll use for drawing borders and placing plants.
Completing the wizard:
- Review that everything looks correct
- Click “Finish Setup” to save your garden
- You’ll see a success confirmation
- You’ll be automatically redirected to your garden dashboard
After completion: Your garden is now ready for the next phases:
- Define your flowerbeds, lawn, patio, and other regions
- Identify and place your existing plants
- Get AI-powered planting recommendations
Previous: Creating a Garden
Next: Floor Plan Editor — Draw your flowerbeds and define different areas of your garden.
Ready to plan your garden?
The Right Plant Right Place app can analyse your specific garden conditions and suggest plants that will thrive in your space.
Get Started Free